
Someday, I’ll actually get to England and see Hadrian’s Wall for myself… but until that point, I’m stuck with surfing the Web to find pictures. For the uninformed, many parts of what remains of the Wall look like overly thick decorative walls – in some places as tall as nine feet (3 meters), but much of the Wall is substantially shorter. (Many of the stones that made up Hadrian’s Wall were carted off over the years to be used in other projects… kind of like a 19th century version of your standard HGTV renovation show.)
Playing the new flip & write game – Hadrian’s Wall – does not require me to “cross the pond” but instead cross off a number of boxes and symbols on my way to doing my duty as a Roman general, building a milecastle and the bordering wall. While the basic game mechanics are simple and straightforward…
- Flip and resolve some cards
- Take resources based on your decisions
- Use those resources to train your troops and build structures
- Face the onslaught of the Picts
…the game itself involves a myriad of decisions in how to best utilize what you’ve been given to accomplish your mission.
From here on out, I’ll be focusing on how the game plays as a solo exercise. Near the end, I’ll offer my completely uninformed opinion about Hadrian’s Wall as a multiplayer game as well.
I Have Seen the Writing on the Wall
The first thing you’ll notice when you pick up the game box is how dang heavy it is for a flip-n-write game… and that’s due to two very thick (and large) pads of paper.
A digression: what do I call these? Scorepads? Score reams? Well, that’s not exactly right – this is more like a paper game board. The rule book calls them Game Pads… but that just makes me think of controllers for my son’s Nintendo Switch.
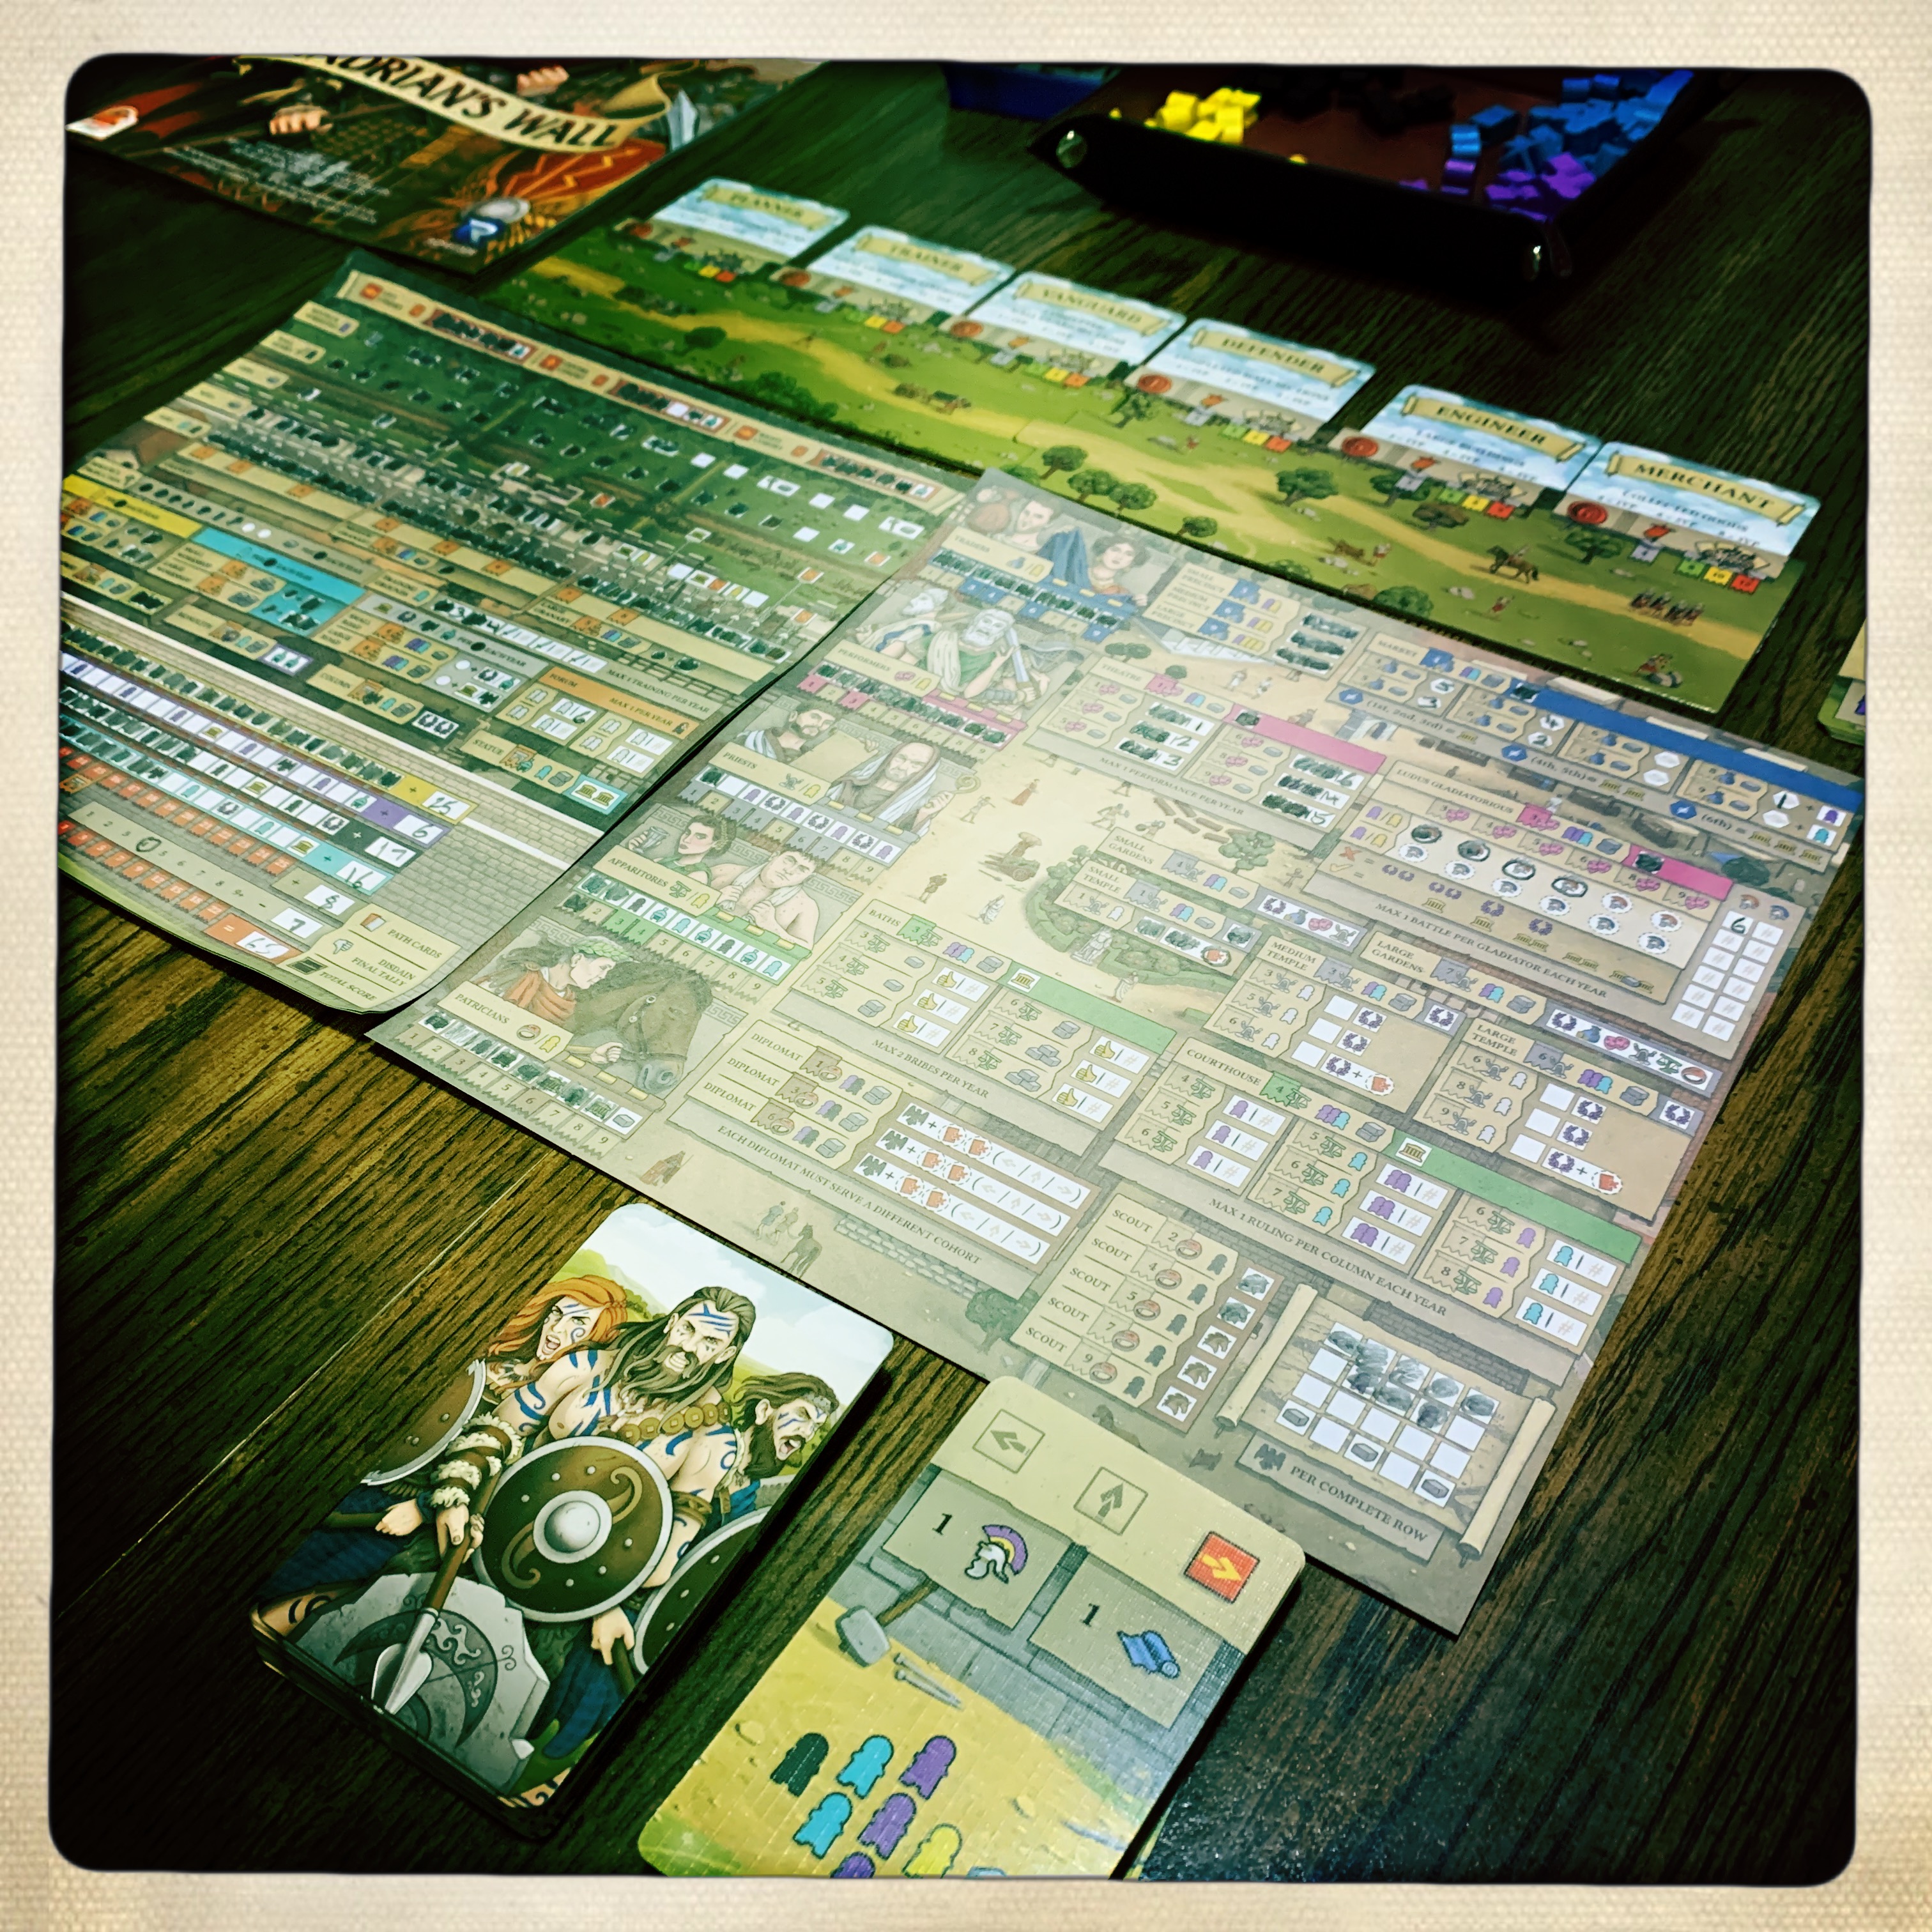
Anyway, you (the solo player) take one of each page to make up an 18×9 writing space. Directly above it is your player board that shows the progress of the six game rounds and acts as a holding area for your workers and resources.
With your trusty #2 pencil (or ink pen, if you’re the kind of person who never makes a mistake) in hand, this double-wide writing area is where all the action happens.
We Don’t Need No Thought Control
Each round, you flip the top card of the Fate deck to receive a set of workers and resources. (The number of workers & resources total 8 on each card, though they vary in amount of workers from 1-3 of each type and 0-2 resources.) You also receive resources based on your resource production (which can be improved throughout the game) and extra workers if you have built the appropriate buildings to attract them.
Then, you flip over two cards from your personal player deck – choosing one to slot under the player board to create end game scoring bonuses and one to place to the side which gives you more workers and/or resources.
Finally, you turn over one card from a second player deck to give you additional areas to scout and a different good to purchase. (This mechanic is used in both 1-2 player games to simulate other players.)
You will have three cards “visible” for each round
- the Fate card (which has a possible good for purchase)
- your Player card (which shows an area to send Scouts to examine)
- the other Player card (which has both a good to purchase and an area for Scouts to, well, scout)
And now the spending of workers and resources begins… you alone decide from a veritable cornucopia of options where to pay to fill in various parts of your community to accomplish a wide variety of objectives.
The left hand “page” of your game board is about the wall and milecastle:
- Increase your cohorts to defend the wall
- Send servants out to harvest resources and increase resource production
- Put soldiers forward as the Wall Guard against attacks from the Picts
- Use Builders and resources to finish the Fort, erect the Wall and prepare the Cippi
- Granaries are essential to allow more development
- Train a Builder to fight as a soldier at the Training Grounds
- Build Hotels, Workshops, and Roads to increase the number of workers
- Use the Forum to retrain workers to do other jobs
The right hand “page” of your game board is about building your community in order to support and enhance your work. Your Citizen workers help attract important groups of Romans who then allow various buildings and opportunities:
- Traders let you create Precincts and open the Market (which allows you to buy Goods)
- Performers help open a Theatre and the Ludus Gladiatorious (bring on the bread & circuses!)
- Priests tend their Gardens and erect ever larger Temples (which can curry Favor to mitigate losses in battle)
- Appariotores allow for the creation of the Baths (a perfect place to bride officials to forget about your shortcomings) and the Courthouse
- Patricians provide you with Diplomats (who can placate the invading Picts) and Scouts
Many spaces on your game “pages” contain a symbol that lets you mark off a space on a different place on the board or provides you with another worker or resource. Setting up chain effects is a particularly enjoyable part of the game design.
Some of the symbols lead you to mark off the four scoring tracks:
- Renown
- Piety
- Valour
- Discipline
These tracks provide end game points as well as additional workers. They also open up the possibility of building landmarks at high enough levels.
Yes, it’s overwhelming the first time you play. Take your time and go back to look at the rules for a particular building or area. Some things you build must be built in order; others allow you to mark boxes as needed. Still other areas require you to note the round number as you can only use them a limited number of times each round.
A strong suggestion: use your first couple of games to explore the space and try things. Don’t spend a lot of mental energy trying to figure out your best move when there is so much going on – it’s more important that you get a feel about how different elements of this game interact.
It’s also important to note that you won’t build everything. This is not Agricola – you can’t (and shouldn’t) try to do a little bit of everything. You’re going to need to lean in a particular direction.
Don’t Be Surprised When a Crack in the Ice Appears Under Your Feet
At the end of each round, the blue-painted folks from the North appear to attack your fortifications. You turn over cards from the Fate deck which indicate where the Picts send their troops – to your left, center, or right. Attacks that are repulsed earn you Valour; attacks that break through give you Disdain.
The Fate deck has one other use that I couldn’t find a great place to mention – so, since it’s combat-adjacent, I’ll put it here. When your gladiators fight, you flip a Fate card in order to see how much damage they take.
How Should I Complete the Wall?
The player deck offers twelve different scoring opportunities (worth 0-3 points each, for a maximum possible score of 18).
- Final Disdain
- Completed Wall Sections
- Completed Cohorts
- Complete Wall Guard Sections
- Filled Temples
- Completed Citizen Tracks
- Total Gladiator Strength
- Completed Scout Columns
- Collected Goods
- Resource Production
- Large Buildings
- Constructed Landmarks
Six of these will be under your player board to be scored at the end of the game.
Add to that four main scoring tracks worth from 0-25 points each. Subtracted from that score is the amount of Disdain you received from losing battles against the Picts.
And with that, you see if you are worthy of leadership… or likely to be working on the next milecastle carting rocks to the site. (Personally, I’ve chosen 60 points as the threshold to count as a win – though it’s the second tier in the rulebook rating system. With that metric, I’ve won three of my eight plays of the game.)
There are three difficulty settings – which are based on the number of Pict attacks you receive at the end of each of the six rounds. Personally, I find the middle (“Normal”) setting to offer the nicest balance between challenge and freedom to pursue a mix of objectives.
Is There Anybody Out There?
As the title makes clear, this is a review about Hadrian’s Wall as a solo game (see my final thoughts below)… but I still have a couple of thoughts about playing it multiplayer. I will stipulate that I haven’t actually played HW with anyone else, which means you need to take my next paragraphs with a rather large grain of salt.
There is very little interaction built into the game engine – only if you choose to send out a Scout or purchase a Trade Good will you give any workers or resources to one of your neighboring players. There are no racing portions of the game – in other words, no player gets a bonus for finishing their wall faster or winning the most battles against the Picts or (says the former theater kid) putting on the most plays at their theater.
In some ways, I think this low level of interaction is probably a good thing. The tableau of two sheets of paper is very busy and would be extremely difficult to read across the table – thus leading to frustration as players would have little or no idea what their opponents were doing.
On the other hand, I’m not sure there’s a great need to push for a full table of players to “get the real experience”. Your mileage may vary, of course… and, because I’m a stand-up guy, I once again remind you that I’ve only played this solo.
There’s Nothing You Can Say to Make Me Change My Mind
So, with all that information about how the game plays (and how the card decks are structured)… what do I think of Hadrian’s Wall as a game?
Honestly, I like it a lot. I’m intrigued by the choices I have as a player and the myriad pathways you can attempt in your quest for accolades and glory. After the first couple of plays that ran about 60-70 minutes, I’m now (just finished game #8 last night) knocking out games in about 35-40 minutes.
The same kinds of resource management issues that draw me into games like Terraforming Mars, Oh My Goods (and it’s cousin, Expedition to Newdale), and Empires of the North are an integral part of Hadrian’s Wall as well. (I’m not saying it’s just like those games or “if you love TM, you’ll love HW”.) These kinds of decisions make for solid solo designs – and Hadrian’s Wall has a lot of them.
In addition, the set-up/tear-down time (due to the flip-n-write design) is minimal, meaning a large chunk of your time is spent actually playing the game. And it has a relatively small table footprint, which means it will work well in my travel kit when I’m stuck in a hotel and need something to play on a less-than-roomy hotel desk.
The color palette of the game “pages” is pretty bland – appropriate to the historical time, but not what we’re used to with many current game designs. That said, the structure of the pages is well-thought-out and contains most of the information you need for play. (There is also a nice player aid for symbols on the back of the rulebook.)
Here’s the big finish – I usually give games I review 4-5 plays before writing the review… and sometimes 2-3 if they really don’t click. When I passed five games with Hadrian’s Wall, I was more than happy to keep playing… and look forward to bringing it to the table in the months ahead.
Notes of Various Kinds
Historical note: there are a variety of theories about the purpose of Hadrian’s Wall – defense from the Picts and other tribes to the north, regulation of trade, etc. I am not qualified to give a historical defense of this game design – but for someone who is a history buff, the combination of various elements of Roman society on the fringes of the empire seems right – gladiators but not to Russell Crowe-like proportions, trade markets and temples, diplomats and scouts (but not always and not always as helpful as you would hope), even a weak attempt at local theater (long before that Bill Shakespeare guy appeared on this very island).
Musical note: the headers for each section of this review are borrowed from Pink Floyd’s classic album, THE WALL (which both seemed thematically appropriate and an homage to my 15 year old self thinking that this album was the deepest thing I’d ever heard.)
Review note: I was provided with a review copy of Hadrian’s Wall by the kind folks at Renegade Game Studios.
Thoughts From Other Opinionated Gamers
Doug G. Shelley and I have gotten this to the table a couple of times, and I had some down time which gave me a chance to try it three times solo. Our first play was…time consuming and felt a bit like I’d signed up to become an accountant. There are a LOT of possibilities on the TWO sheets and quite a bit of bouncing from one action to another possibility. It may say 1-6 on the box, but this is very much a solo game with very little interaction. Can you use other people’s Trade Goods or Scouts? Sure! Do you do that very often? Not in the games we played. As we played more (and I played solo), the game did speed up, and I could see myself laminating the sheets and getting a game in under 40 minutes or so. I liked it, but I’m not sure it’s a necessary add to one’s collection, unless you’re going to continue quarantining, or play a LOT of solo games. OH, and Mark’s right that the game is HEAVY! I stood it on one end, and when it fell over, it split the box top at the corners….GRRR…
Dale Y: 4 plays, 3 of which were solo. So – I love the idea of this game – A complex roll-and-write that prizes efficiency and has comboliciousness? When I first read it, I was chomping at the bit to get it and try it. The fifteen pound box arrived (ok, slight exaggeration) – but 400 player sheets is not light! – and I broke out the 24 page rule book, and yikes, I felt overwhelmed a bit. Nevertheless, I plowed through the rules, and I felt pretty good that the base of the rules was only a few pages, the bulk was explanations on how all the different actions worked. So, I sat down, got out the bits, and tried to play the first game solo. I flipped over my first card, saw that I had 7 meeples and a stone to work with, and then I froze. There are at least 25 different places that I could mark on my sheet, each of which leads down different pathways to different combos – and there is no guidance whatsoever to help you figure out what would be best. Admittedly, I normally hate it when games give you strategy guides in the rules and tell you how to play – but here, I felt like I was headed down a rabbit hole with no guiding light and no end in sight. My first turn took about 15 minutes because I had to look at all my choices, try to follow the paths, refer to the rulebook to remind me what each thing did, etc. It’s amazing to think that you only get 6 turns in the game (Each with maybe 6 to 9 things on the card as initial resources) – but everything in this game is about the combos.
In one midgame example, once you get things set up right, you will hopefully use two of your starting stone resources to mark off some spaces in the wall, which will give you an additional meeple and a spot in one of your cohort. That cohort mark gives you a Renown point. That yellow meeple which was gained from the wall can go into the Traders area, which gives you a purple meeple. The purple meeple just gained, along with another yellow meeple from your card can build the small precinct which then gives you a Piety point (hooray – a purple meeple as a bonus!), a mark on the resource production track (leading to one more stone per round) as well as a stone. The purple meeps goes into the Mining and Foresting row, leading to another production point and yet another stone. So – to sum it up, so far you have used 2 stone and a yellow meeple from your card (around one third of the starting resources), and you have gained a Renown point, 2 production points, a Piety point, and you have gotten two stone back. So really, you’ve only used a single yellow meeple from your card for the round! And now you get to plan out the rest of your turn – you still have 2 stone, two aqua meeples, a purple meeple and a black meeple to go! Whew. Yeah, I am trying to make a little bit of a convoluted example; but in reality, this is what a lot of the turns are like. For many people, this is going to totally be their jam – and they’ll love trying to untangle the combinations and figure out how to get the most out of each action. For me, it felt more like work than my real life job. I talked it over with a few other people, and they did point out that I loved this sort of interaction in Ganz Schon Clever, and they were surprised that I didn’t like it here. I hadn’t made the connection in my initial processing of the game, and they are totally correct – those games are very similar in that regard. Here, I think the vastness of the sheets and the multitude of choices is just too much for me to process fully.
My first game took almost 90 minutes – though some of that was just referring and re-reading the rules to try to understand what all my options were. By the third solo game, I was down to 35 or 40 minutes, though the games might have been artificially quicker because I still don’t feel like I get the strategy here, and after awhile, I would just mark stuff and see what would happen. Rather than planning out my turn, it turned into Hadrian’s Plinko, where I’d put a meeple into a slot at the top of the board, and watch it tumble down and see what happened and what sorts of bonuses came out of the machine, then put those things onto the board and again see what happened.
The one time that I played this with other gamers, it was just fine, but it really didn’t feel much different. We all pretty much were playing solitaire and could joke around with each other in the moments we weren’t staring at our sheets…. Sure, now when I traded, my opponent’s got some extra stuff, but I was so busy with my own sheet, I honestly didn’t see how much that affected things. There was a constant chorus of “are you done?”, as the game is in a holding pattern until each player has finished the action phase – and I felt like I rushed through this a bit in order to not be the one holding up the game. That was the main difference in the multiplayer game to me – I had more time pressure to finish up quickly so as not to hold up everyone else.
After 4 games, I think I can say that I understand all the actions as far as how they work, but I honestly still don’t have a great idea how to succeed at the game. Normally, that’s an attribute that makes me really like a game and want to go back and play it again and again until I can unlock its secrets. I’ll admit that I don’t have the same feeling here, maybe it’s because it feels like work; maybe it’s because I’m tired of having to play solo games, and I really want to get back to normalcy. I probably wouldn’t say no to playing it again, but I don’t think I’ll break it out to play solo either. It’s a little on the long side for what I normally want to do in a solo game, and it’s a little more complex than I’m looking for in flip and write; but again, this is a personal thing – in this case, it’s not the game, it’s me. I’m honestly surprised that I don’t like it seeing how much I like other games with combos in them, but after 4 games, this one just hasn’t clicked for me.
Ratings from the Opinionated Gamers
I love it!
I like it. Mark Jackson, Alan How, Doug G.
Neutral.
Not for me… Dale Y
Mark, you raise a good point about setup/teardown time for X and writes. In reflecting on Rome & Roll, I wondered whether it needed to use the write mechanism or would have been better with regular components, but the setup/teardown time difference is an important consideration
I haven’t had the chance to play Rome & Roll yet… but I’m certainly interested!
While we’re on the subject of ancient empires, I’m really curious about Imperium: Classics and Imperium: Legends (which, oddly enough, has the same designer as Rome & Roll.)
If it helps at all, the controllers for the Switch are actually called Joy Cons, not Game Pads ;)
You are correct – as my son pointed out to me. I am sadly unhip when it comes to video games. :-)
I appreciate The Wall references :) Haven’t decided on this one yet, though I enjoy Fleet The Dice Game, so I imagine I would like this.